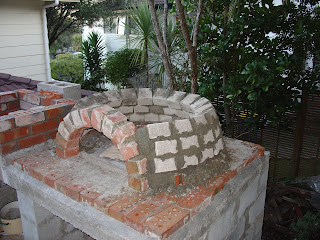
Yes, sounds strange I know but I need some pantyhose to do the next section of the oven. The next thing I need to do is cover the oven in a layer of vermiculite, it comes in granules which makes it hard to cover a circular surface. So the idea is to fill the legs of pantyhose with vermiculite and then wrap them around the oven before covering it all with a layer of plaster.
So are there any ladies (or wanna be ladies) in the Auckland region who can help me, I need about 10 pairs. If you can you can email me jim@west.net.nz, or leave a message on Facebook http://www.facebook.com/Jimboeri
Thanks
Jim
Sunday, July 18, 2010
Pizza oven #9
 The first part of the oven dome is now complete. The first couple of courses are quite easy, the bricks are split and then laid with the mud/clay/mortar mix using a piece of plywood cut in a quarter circle with a 420-mm radius as a guide. You can get about 2 courses done a day, then let the mortar cure before starting again.
Eventually the angle of the bricks is such that gravity takes over and you need something else to continue laying the bricks. A swiss ball is used for this, I thought I might need some bricks to lift it up a bit, but the ball I was using was big enough on it's own.
 I still carried on at 2 courses a day, it wasn't hard work but it was a bit tricky. I gave up with using a trowel early on, I put on some thick rubber gloves and picked up the mortar with my hands and poked it where it was needed with my fingers.
Quite satisfying to have completed the dome so far.
 The next bit was really easy, a layer of the mud/clay/mortar over everything for a covering of about 5cm. This links it all together, and adds more bulk to retain heat when cooking.
 I understand that the most important part of getting pizzas right is getting the oven temperature right. So I have been fortunate in getting a thermocouple from my swimming friend Geoff, thanks Geoff. It's inserted in the oven wall, we'll have to see how it works when the oven gets fired up!
Monday, July 12, 2010
Pizza oven #8
 Some progress to report. While waiting for the fire bricks I did do some work on the BBQ side as you can see, I am going to make a back wall for the BBQ but that will happen when the oven is complete.
I picked up the fire bricks and pizza hearth tiles on the weekend. Took a while to cut the pizza tiles (a thin fire brick) to size but got it done, then a thin layer of sand & cement on the base bricks so they lie flat and then the tiles go down. Once that was done I started on the oven dome which means that all my firebricks need to be cut in half, not too difficult though.

My main conumdrum was what to use for the mortar. Andrew next door use refractory concrete/mortar, but that costs $100 for a small bucket and he went through 2.5 of these and I didn't want to spend that sort of money. Robin in his article uses clay from the garden mixed with sand and cement, but the guy from the place I bought the fire bricks recommended using Lawsons Super, a cement admixture. These guys all know more than me!
So while Andrews option was obviously good, it was expensive, and Robin has done heaps of ovens so there is no reason to believe that the clay/cement mixture won't work. So I've gone with Robin's mixture, but added the Lawson Super to make the mixture more workable and for insurance. But I won't know if I've done it wrong until it's too late, bugger.
 But at least it's starting to look like an oven.
Monday, July 05, 2010
Pizza oven #7
 I haven't updated the blog in a while, the slab needed to cure for a few days and I needed to get more materials for the oven and BBQ.
I scored a great freebie and got around 200 second hand bricks from Jan Battaerd at the surf club, and I have ordered some firebricks too.
A layer of bricks goes on the slab, helps to retain the heat, and these are held in place with a line of mortar around the edge.
The oven and inner arch are made of half bricks held together with a 'mud' mortar. Robin Overall's design uses a mixture of cement, sand and clay/subsoil. I was a little concerned about this and was considering getting some commercial fireclay. Bit a bit of reading in the 'net and I found that the grey clay that is the bane of east coast bay gardeners is basically fireclay so I decided to stay with Robins method.
I'll carry on when the firebricks arrive.
Thursday, June 24, 2010
Pizza oven #6
I have now achieved my first major milestone, I have a base on which to build the oven itself. I must be getting alittle more used to it but mixing, moving from the front of the house and pouring the slab seemed easier that the other concreting operations. I think the local hire man will be disappointed I'm finished. As you can see even more rebar to hold it together.
Friday, June 18, 2010
Pizza oven #5
Next is to box up for the slab that goes on top, and which will hold up the pizza oven and BBQ, not too hard so should give a little time for the body to recover. I am feeling a little weary & sore tonight!
Tuesday, June 15, 2010
Pizza oven #4
The base for the pizza oven progresses. I am getting a bit better at block laying, but I'm sure I'm Auckland's slowest. The Magazine article author, Robin Overall, said that the blocks should just be laid on each other and then filled with concrete, it would be faster and more accurate for people who haven't laid block/bricks before and I'm sure he is right.
I decided to mortar the block together as i) I wanted to learn how and ii) as its 2m tall I wanted more strength while I am pouring the concrete into the blocks. I've added a bond beam, again due to it's height and the length of it.
Friday, June 11, 2010
Pizza oven #3
Pizza oven #2
It's raining today so I don't think I'll get much done.
I've been in touch with The Shed magazine about the article, you can call 09 302 3172 or email fiona@theshedmag.co.nz. They will send the article for NZ $10.00.
I've been in touch with The Shed magazine about the article, you can call 09 302 3172 or email fiona@theshedmag.co.nz. They will send the article for NZ $10.00.
Thursday, June 10, 2010
Pizza Oven #1

Our family loves their home made pizzas so some time ago I decided to make a pizza oven. The inspiration came from a magazine article in the Shed Magazine, my next door neighbour got onto it straight away and built one so I have some motivation to do mine, and someone to ask advice if needed.
I decided to build it next to the deck at the back of the house, we had cleared some privets out of area some time ago and it was an obvious place to build it. However I decided to do a bit more, the pizza oven needs a base of about 1.4m by 1.4m and I had an area that was 2.2m long, so I decided to build the base 1.4m by 2.2m and have a pizza oven on one side and then a brick braai/BBQ on the other side.
The material for the base was ordered and delivered, but all the the front of the house and so began the task of carrying stuff round the back, 145 concrete blocks at 3 blocks per load... you can work it out, but it took all afternoon and still a few left. I then cut the steel reinforcing (rebar) for the footings and blocks.
Yesterday the weather was forecast to be fine so I hired a concrete mixer and set about pouring the footings, not too difficult a job, just hard work carrying numerous barrows of concrete from the mixer at the front of the house to the back, transferring into buckets to get down the steps and then into the footings. Put about 50mm of concrete in, then put in the rebar, and then finished pouring the concrete.
Once I had finished pouring the concrete, I waited for an hour (well a bit of tidying up, and a cup of tea produced by Alison) and then I laid the first course of blocks. Took a while to get them all level and square especially as I am trying to mortar them together but got there in the end.
Firsts for the day: hiring a concrete mixer, mortaring and laying masonry blocks.
Home time


Vodafone had a reorganisation in the IT department and I took a redundancy package which means I am now at home, both looking for the next career opportunity, but also doing those projects at home that I have been thinking about for a while.
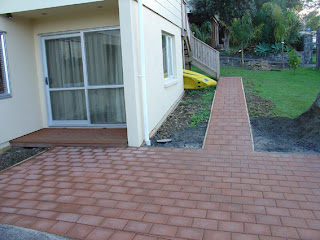
The first project was to create a paved area next to the driveway and a path to the steps to our front door. The front yard has been a tragic area for a while (years actually) ever since our house renovations. This has been done but the front lawn has to wait for a while as it is currently covered in builders mix for the next project... the Pizza oven.
Subscribe to:
Comments (Atom)